The Needle Hike- Ultimate guide to the famous cross-Island track in Rarotonga
Rarotonga, Cook Islands doesn’t have to be all about water activities, or lagoon exploration. You can have a little adventure by hiking up to The Needle (Te Rua Manga) in Rarotonga.
Hiking in Rarotonga is not as popular of activity when people think of Rarotonga. But it definitely is worth doing, and it’s one of my top favorite things to do in Rarotonga. Especially if you’re tired of getting in the water and just want to do something different.
The Cross Island track is the most famous hiking track in Rarotonga, you start from the north side of Rarotonga and finish up on the south side, or the other way round. Which takes you up to The Needle, and down to Wigmore’s Waterfall.
About The Needle, Rarotonga
The whole cross-island track: 3-5 hours (From the actual start point of the hike)
North to South- Recommended
Intermediate- Difficult
It is a cross-island track, from either the north side of Rarotonga to the south or vice versa. You do need a reasonable fitness level to complete this track and be prepared for some muddy track and rope climbing along the way. Do this hike early in the morning, so you have plenty of time to finish before sunset, you do not want to be stuck in this cross-island hike at dark.
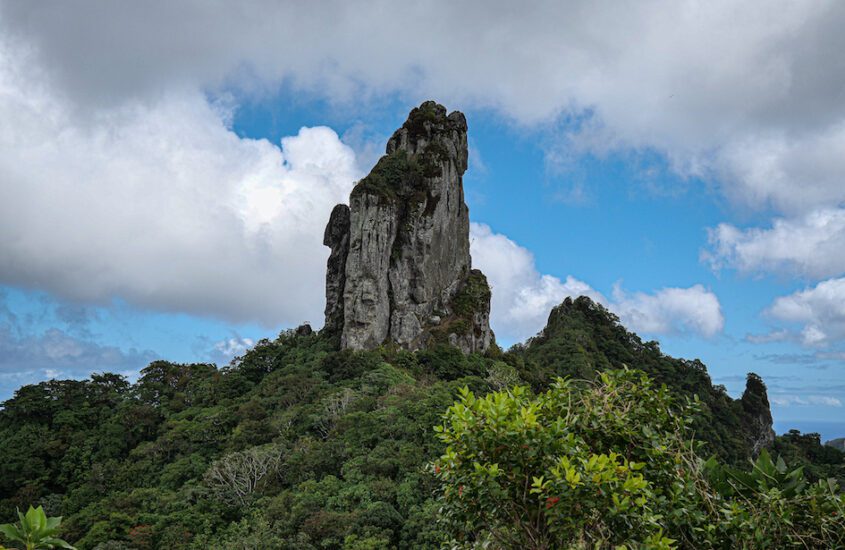
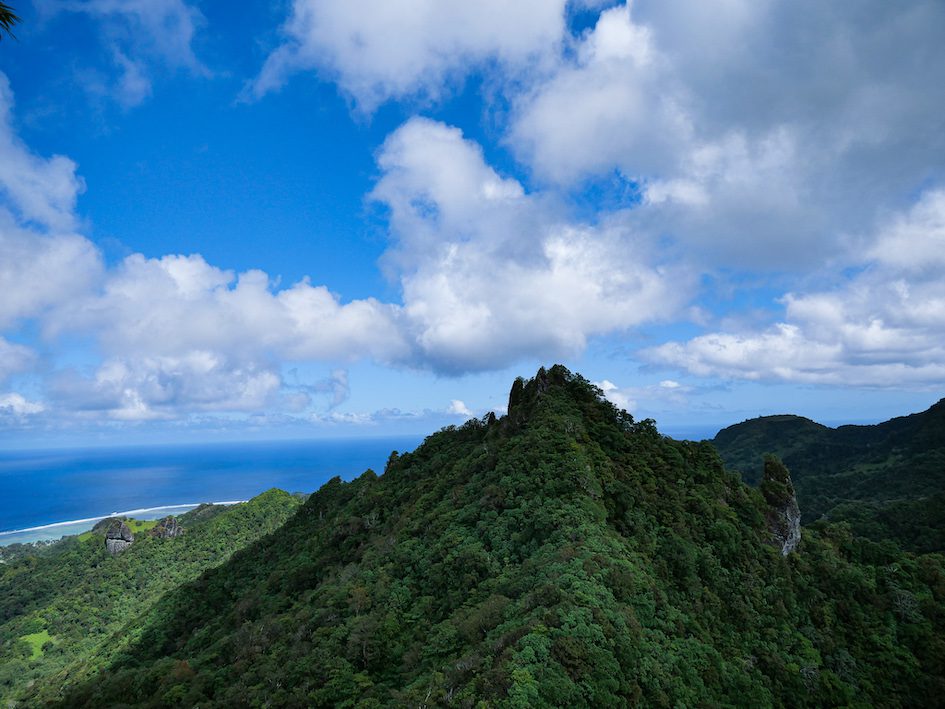
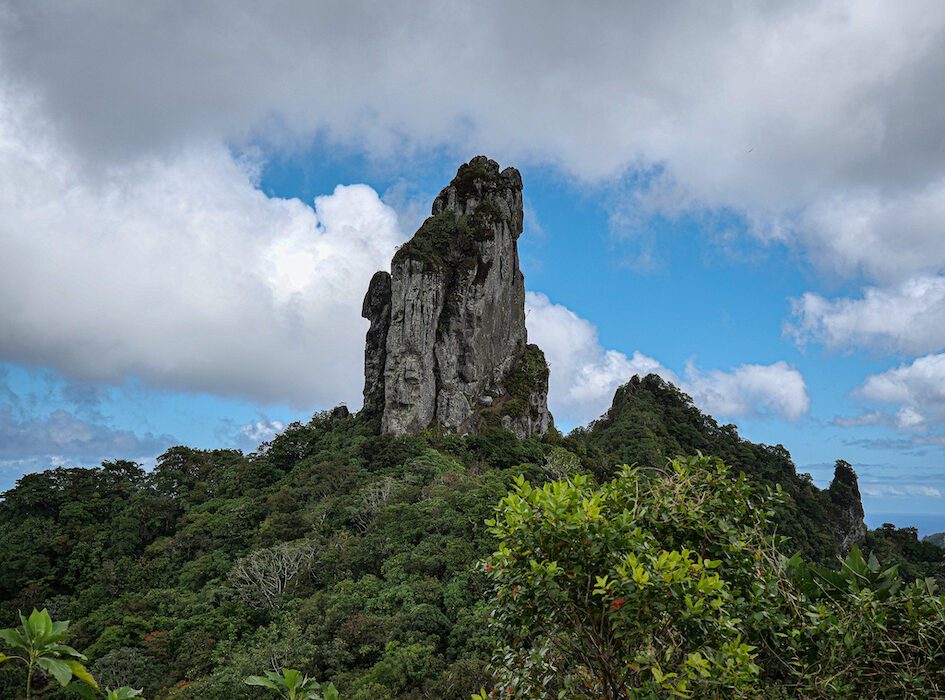
The Needle is the most famous and well-known landmark throughout the whole cross-island track and the biggest reason why many people choose this track. However, there is so much more to this track than The Needle, it offers views of the mountain ranges, lagoon, and beyond, and has a taste of jungle life in Rarotonga.
The whole cross-island track is very achievable as long as you are careful, and look out for the right path. Definitely go with a guide if you’re not a confident hiker but still want to experience this. Also, take into account the humidity and heat of Rarotonga, especially during the warmer months of November- March. And there are many mosquitoes throughout the hike, so make sure you have enough insect repellent (tropical strength) on you to avoid the consequence of insect bites, especially since dengue is still ongoing in Rarotonga.
How to get to the start of the cross-Island hike (The Needle) in Rarotonga
There are two options for how to get to the start of The Needle hike, you can either walk or drive to the starting point. And there’s a cross-island track which you can either start from the island’s north side or the south. I’ve personally done it from the north side as it was the most recommended, but I also know people who actually prefer starting from the south first. So it’s totally up to you 🙂
North side of Rarotonga- The Needle Hike start point
Walking
30-40 minutes walk
Many people choose to just walk to the start point, as it’s a hassle to park the car at one side and have to catch the bus from the other side when you finish the hike. The way towards the start point is all flat and easy to walk!

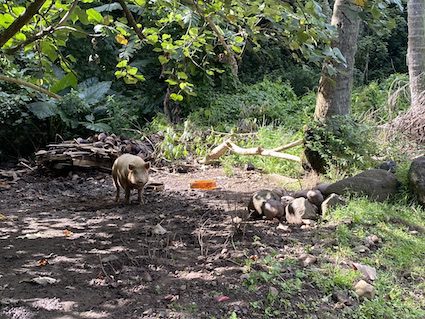
You can take the bus to palace takeaways, or Punanga Nui market, and across the street, you’ll see the Island surf shop and the street next to it is the one you need to take. You should see a petrol station on your right, keep going straight down, do not turn right (that’s to the airport). You will pass by many domestic animals, like pigs, chickens, and goats.
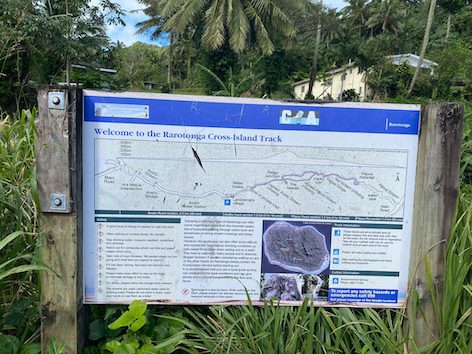
It should take you around 30-40 minutes to walk to the starting point of The Needle hike, it is more straightforward than it seems. Toward the last part, you should see a Power station, not long after that will be the starting point. Google map is super handy, it leads you up to where the little car park is and after that, it’s pretty clear where the hike is. You’ll see a sign saying Cross Island Walk, and a stone commemorating Pa Teuruaa (retired now, but was a well-known tour guide for the cross-island walk).
Driving
The same route as I mentioned in the above walking route, around 7 minute’s drive. The car park is very small so I imagine it does get very crowded on a busy day. You will see a big board introducing the cross-island track, The Needle in Rarotonga, this is the furthest you can drive, or get dropped off.
Driving can be a hassle as the start and end points are different, but if you can find someone with another car. Two cars can park at different ends, so you’ll have a car at the start point and at the end of the cross-island hike. Otherwise, after you catch the bus from the south end to the north island, you’d have to walk all the way back to the start point (which makes driving in the first place kind of pointless).
Make sure you lock your car and hide everything away from sight. Best practice to avoid any unpleasant experience.
South side of Rarotonga- The Needle in Rarotonga start point
I’ll only briefly touch on this side of the starting point for The Needle hike in Rarotonga, as I personally did the other way round, and would also recommend starting from the north.
If you start on this side, The Wigmore’s Waterfall is your starting point. You can take the bus to the main street just outside of The Wigmore’s waterfall, and it’s around 15 minutes walk to the waterfall. You’d pass by Rarotonga SPCA (dogs bark a lot there), and not long after you should hear the waterfall. Park your car just near Wigmore’s Waterfall, or get dropped off here and start your cross-island track from the left side.
This side-up would be quite tough, as it’s the longer part of the track leading up to The Needle, and with river-crossing, muddier, and also easier to get confused.
Northside start point up to The Needle in Rarotonga
1-2 hours
The easier part of the track
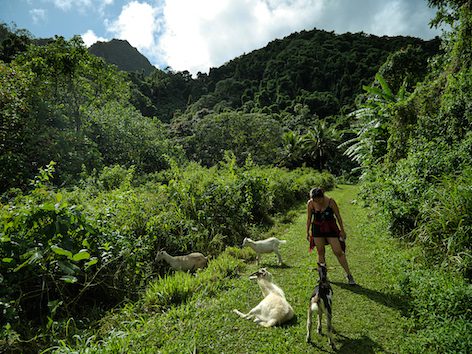
The part of the cross-island track is the easier part, it is hard work as it’s constantly going up the steep hill. At first, there will be some very adorable goats/sheep welcoming you. And then you’ll mostly be covered by all the trees, it’s like navigating in a jungle. Sturdy hiking shoes are a must, the hike is muddy, and with tree branches everywhere.
This part of the track is quite straightforward, the signs are pretty clear and it’s quite obvious which ways to take. Along the track, you’ll see the yellow tape wrapped on trees, as long as you’re seeing this you’re still on the right track.
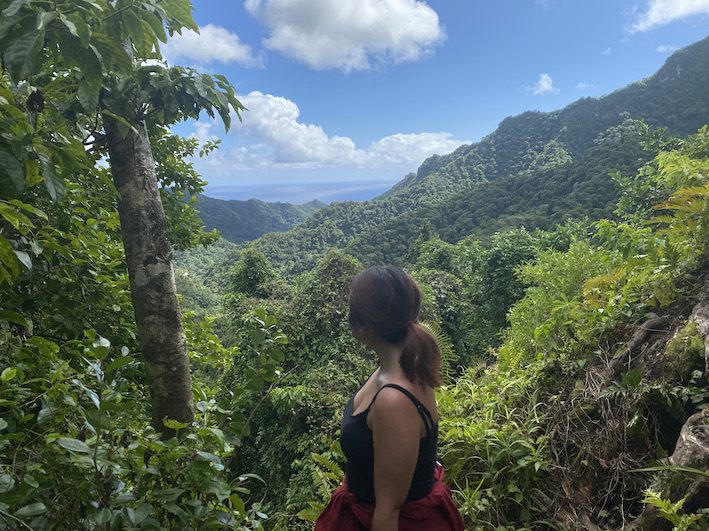
After a while, you’ll start seeing the mountain ranges and the ocean beyond. This also means you’re not too far from The Needle Lookout, so don’t give up 🙂 Once you reach the lookout, you’re standing right below The Needle. And you can choose to climb onto The Needle itself or not, but it is quite dangerous as you’re literally holding up to the chain to pull yourself up; so only do it if you’re 100% confident. Otherwise, the view from the lookout is amazing enough!

The Needle back down to the Wigmore’s Waterfall (Southside end)
2-3 hours
The harder part of the track
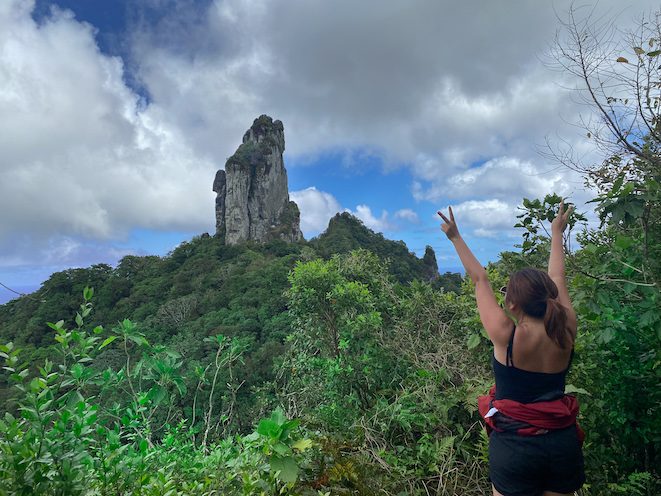
This is the part where it gets a bit funny and more confusing, this part was a bit more tiring than I’d expected. At first, you’d have a bit of balance of uphill and downhill which will lead you to an amazing viewpoint of The Needle from afar, remember to take lots of pictures here 🙂
Once you pass through the different view angles for The Needle from afar, you’ll get to the most confusing part of the track. The track here isn’t well-marked, and it can be hard to find the right path, you’d have to be really careful and focused.
Also, this is where all the river-crossings are, some of the river’s water level is quite high. It’s almost inevitable for your shoes to get wet, and they are very slippery so walk very slowly and look out which rocks you’re stepping next (watch out for the moss on rocks).
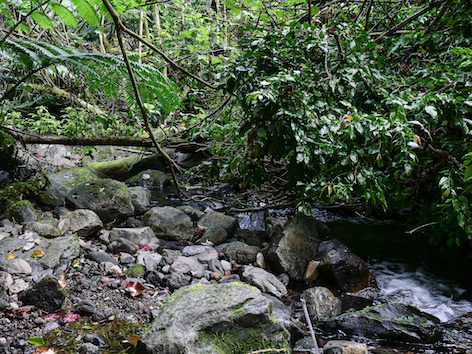

There are many ropes and chains along the way, which comes in handy at times. Don’t panic if you seem lost, I felt lost multiple times on this part of the cross-Islands track. But then I took my time to navigate and made sure I don’t rush in the wrong direction.
I was lucky enough that there was fresh orange paint marking the right path when I was there, otherwise, it would’ve been a lot harder. I have to say this part of the track was quite horrendous, I was very happy when I saw Wigmore’s Waterfall haha! But that being said, it was a great adventure having a taste of the jungle in Rarotonga, and crossing those rivers.
Should I go with a guide for The Needle hike in Rarotonga
- Are you a confident hiker (do you hike often)
- Do you have a good sense of orientation and direction?
After you have the answers, then you can decide whether you should go with a guide or not. The guide will make sure you’re safe and on the right path, also you’ll learn a lot more about the track and the different species you encounter along the way.
Maunga Tours offers good guided tours to the cross-island track up to The Needle in Rarotonga. With an experienced guide, you don’t have to worry about getting lost!
It is definitely possible to do it without a guide, as I and many others have done so. But don’t do this hike alone, always go with at least a pair. It is very dangerous to go alone, getting lost or hurt off-track alone in the jungle is the last thing you want.
What to Wear and Pack for The cross-island track- The Needle in Rarotonga
What to Pack
- At least 1L of water per person to stay hydrated
- Food to stay energetic: energy bars, sandwiches, crisps, sweets, nuts… there’s really no rule. Just bring something easy to pack, and those will keep your sugar level up. Most importantly, whatever you bring up should come down with you. Please remember to take your rubbish down!
- Emergency Kits: Bandages, plasters, compass, fire starter, wipes, Ibuprofen, etc. Usually, a first-aid kit would be sufficient!
- Sunscreen
- Sunglasses (Optional)
- Hats (Optional)
- Multi-Tool, Knives (Optional)
- Rubbish Bag (Optional): If you don’t mind putting rubbish in your backpack!
- Extra socks (Optional): Just in case your feet are soaked, or muddy.
What to wear
- Tank tops, short sleeves shirts: It is very humid and hot, and you don’t want to risk having sunstroke.
- Shorts: Highly recommended especially for the warmer months from November- March. Your legs will get dirty but who cares!
- Pants: track pants, running pants, yoga pants. Anything that is stretchy, durable, and not baggy. Those that dry quickly would be even more ideal! But prepare for long pants to get dirty and wet!
- Shoes: Hiking shoes would be most recommended, or shoes with good grip, and sturdy bottoms.
- Rain jacket/ poncho- It can rain randomly even on the sunniest day.
- Sunglasses (Optional)
There’s really no rule when it comes to choosing what to wear. Of course, wearing the right things will definitely make your hike more pleasant and easy! DO NOT wear denim jeans; you will not make it up there with jeans!
Final Tips for hiking up The Needle in Rarotonga
- Do not hike alone
- Inform someone that you’re doing this hike (your accommodation providers, friends that aren’t doing the hike, etc.)
- Bring plenty of water
- Start early in the morning, so have plenty of time to finish the hike before sunset
- Don’t rush, stay calm even when you seem lost
- Watch out for the tree roots
- Look out for any bright colors signs, so you know you’re on the right path
It is truly an amazing adventurous experience, you go home with a sense of accomplishment and many amazing photos. It does take persistence to finish the whole hike, most of the time you gotta be very focused to not go off track or trip/ slip on some rocks or roots.
Other things to do in Rarotonga
Swim with Turtles
If you love marine life and would like to explore deeper and encounter turtles right by your side. The swim with turtles tour is perfect for you.
Island night
Experience the culture of Rarotonga, Cook Islands. Try out UMU-style cooking, and watch the dance performance and cultural demonstration all in one night.
Progressive Dinner
Get to know the locals and have a 3-course dinner with three local families at different locations. Learn as they share their way of life, and their cultures and enjoy the local authentic cuisines made by them.
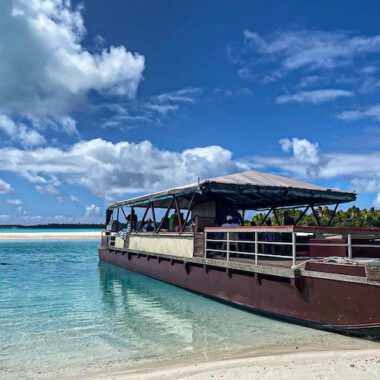
Captain Tama’s Lagoon cruise
Get on the glass bottom boat, and experience a series of entertainment and island energy. Explore the underwater world by snorkeling at a marine reserve. And finish the day with some delicious fish BBQ.
Snorkeling
Best free activity to do in Rarotonga, all you need is your swimwear, and snorkel gear and the lagoon is free for you to explore 🙂 Amazing marine life, colorful corals, and pristine water.